Guide on setting up Telnyx networking on pfSense. See Telnyx guidance and requirements Learn more about Telnyx Networking on PfSense with Telnyx.
PfSense with the Telnyx Network
Step 1: Telnyx Configuration with PfSense
Reference the introduction to Telnyx Networking section located here: Telnyx Configuration
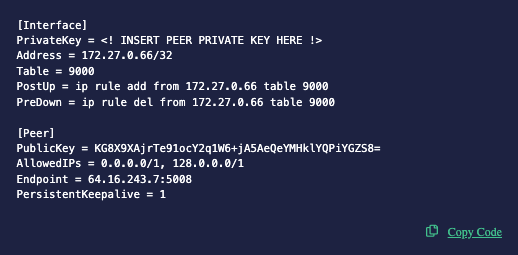
Copy and take note of the Peer Configuration file along with the private key that you got assigned from the above tutorial, it should look like the following:
Step 1.5 Telnyx Setup using API
We can also utilize direct API calls to set up everything from above
- Create a new Network
curl --request POST \
  --url https://api.telnyx.com/v2/networks \
  --header 'Authorization: Bearer <YOUR_TOKEN_HERE>' \
  --header 'Content-Type: application/json' \
  --data '{
    "name": "Test Network"
}'
- Create a Wireguard Interface
curl -i -X POST \
  https://api.telnyx.com/v2/wireguard_interfaces \
  -H 'Authorization: Bearer <YOUR_TOKEN_HERE>' \
  -H 'Content-Type: application/json' \
  -d '{
    "network_id": "<NETWORK_ID_HERE>",
    "name": "test interface",
    "region_code": "ashburn-va"
  }'
- Create a Wireguard Peer
curl -i -X POST \
  https://api.telnyx.com/v2/wireguard_peers \
  -H 'Authorization: Bearer <YOUR_TOKEN_HERE>' \
  -H 'Content-Type: application/json' \
  -d '{
    "wireguard_interface_id": "<WIREGUARD_INTERFACE_ID_HERE>"
  }'
Note: At this current stage, only ports 80/443 are supported and are looking into broadening this to encompass more ports.
Step 2. PfSense Configuration
-
Ensure you have the Wireguard package installed
-
Setup Wireguard on Pfsense
-
Navigate to VPN -> Wireguard
-
Add a new Tunnel
- Give the tunnel a descriptive name, like telnyx_wg.
- Paste the Private Key from Telnyx Setup: 3. Create a Wireguard Peer into Private Key for the Interface Keys.
-
Add a new Peer
- Uncheck the Dynamic Endpoint
- Paste the Endpoint from Telnyx Setup: 3. Create a Wireguard Peer into Endpoint.
- Paste the Public Key from Telnyx Setup: 3. Create a Wireguard Peer into Public Key
- Paste the allowed IPs from Telnyx Setup: 3. Create a Wireguard Peer into Allowed IPs
-
-
Setup the Interface for Wireguard
-
Navigate to Interface -> Assignments
-
Add a new interface with the Wireguard tunnel (ie, telnyx_wg)
-
Click on the Interface to edit it
- Set IPv4 Configuration Type to Static IPv4
- Under Static IPv4 Configuration, set the IPv4 Address to the Interface Address found in Telnyx Setup: 3. Create a Wireguard Peer
- Select /16 for the subnet mask.
-
Step 3. Setting up 1:1 NAT and outbound NAT
You will need two NAT configs:
- The 1:1 NAT so that when traffic ingresses through your Wireguard peer, it will route to your service VM
- Outbound NAT so that your service VM can send the traffic back to your pfsense instance without needing to know about the route to the Wireguard interface, and your pfsense instance can send the traffic back to the Wireguard gateway
-
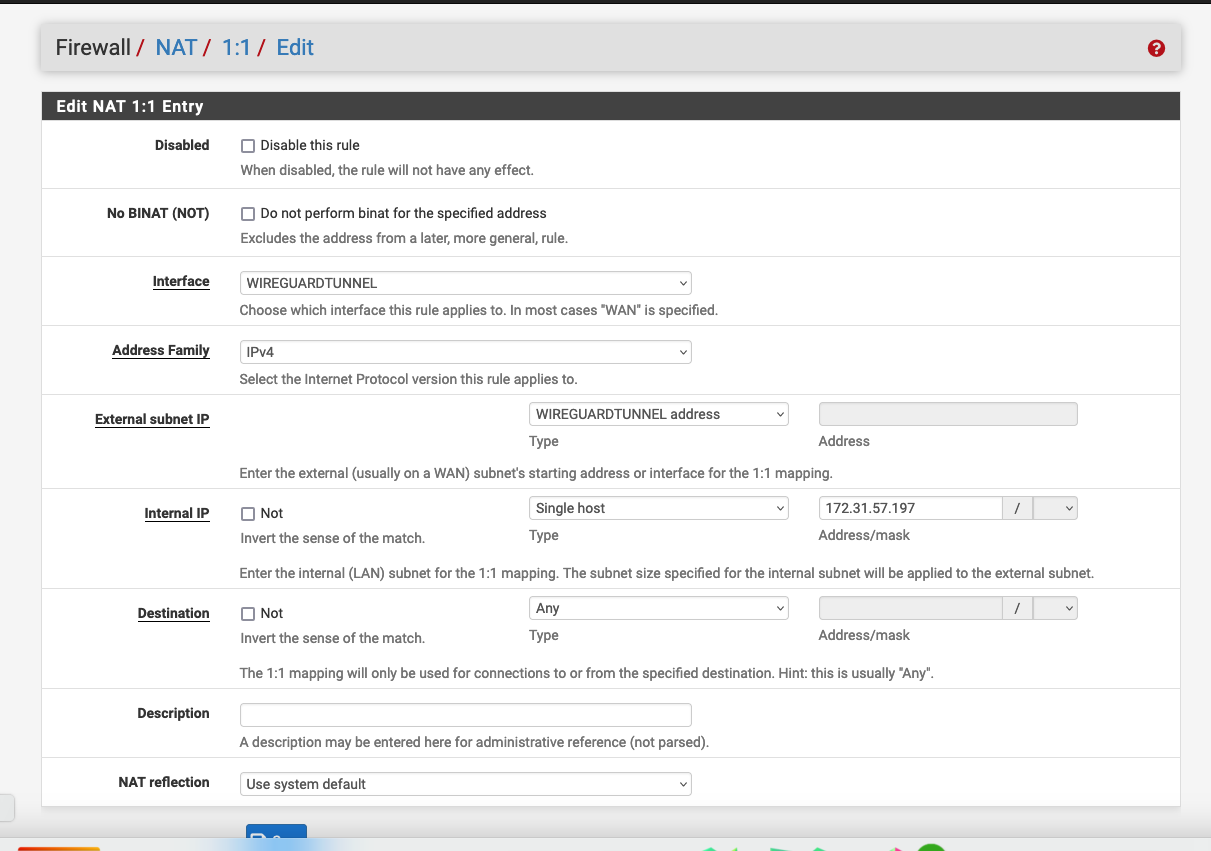
Create a 1:1 NAT mapping with the following:
- Interface: the Wireguard tunnel interface
- External subnet: Wireguard tunnel Interface address
- Internal IP: the IP address of the machine you are hosting your machine on
-
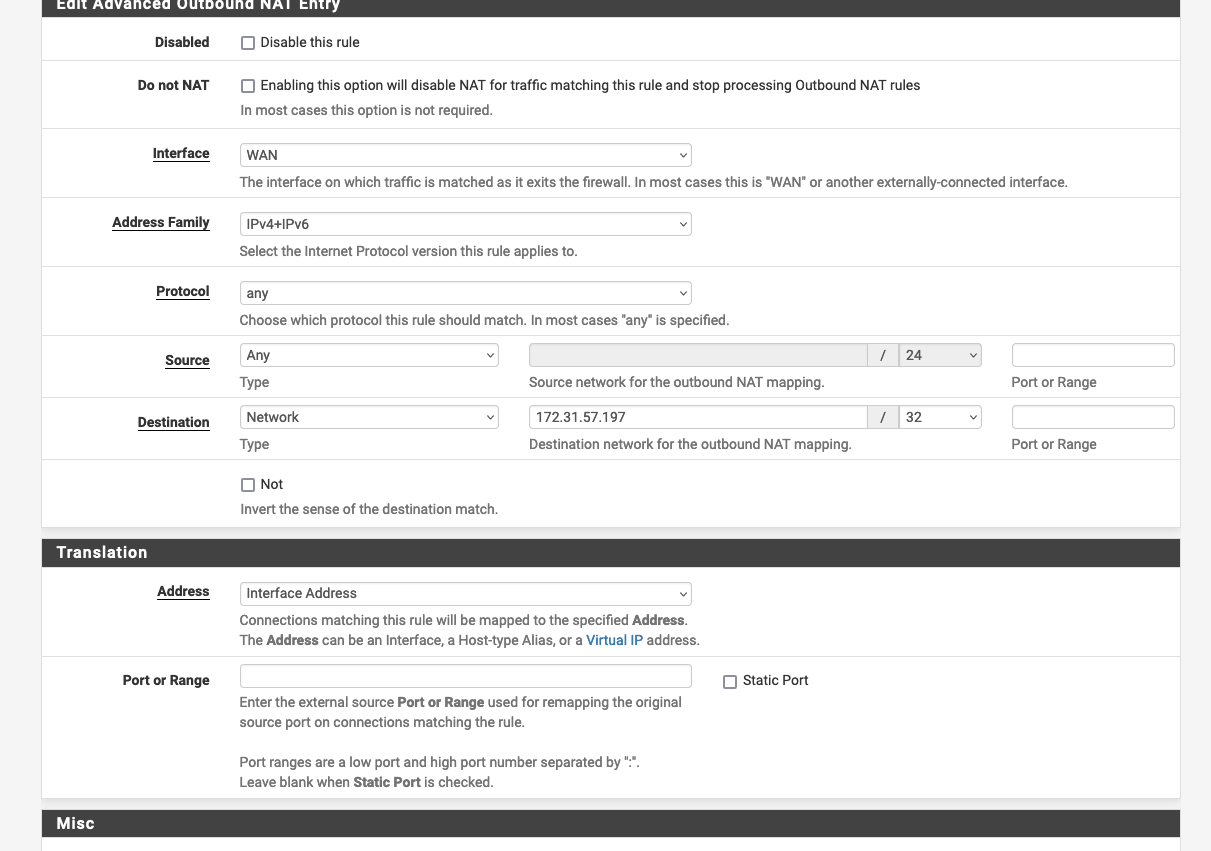
Create an Outbound NAT with the following:
-
Interface: WAN interface (or whichever interface your VM is also listening on)
-
Address Family: IPv4 + IPv6
-
Protocol: any (restrict as you would like)
-
Source: Any (restrict as you would like)
-
Destination: specify the IP address of your VM on the Interface
-
Translation
- Address: Interface Address